Instalarea unui nou server DaDesktop
Deploy nod DD pe un server GTHost / Hetzner
Notele de mai jos îți sunt oferite pentru a te ajuta să faci deploy la un Nod DaDesktop (Server) pe un server bare metal Linux de la GTHost, Hetzner sau alt provider similar. Reține că aceste note se pot modifica pe măsură ce scriptul de instalare și deploy se schimbă.
Se presupune că ai achiziționat deja un server și că acesta va fi configurat cu Ubuntu Jammy 22.04. De reținut că utilizarea RAID0, adică Striping, poate fi folosită pentru a accelera accesul la disc dacă ai suficient spațiu cu două sau mai multe discuri. Acest lucru trebuie definit în Hetzner cu procesul 'installimage' când te afli în modul Rescue.
Pregătirea, instalarea sistemului de operare dacă folosești un server GTHost / Hetzner
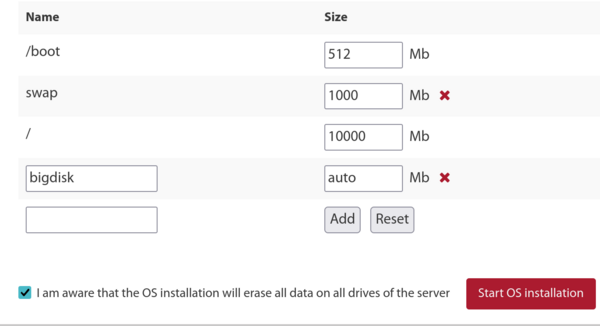
- Mai întâi, conectează-te prin SSH folosind credentialele root furnizate, rulează 'apt update', 'apt upgrade' pentru a te asigura că toate pachetele sunt actualizate. Apoi rulează 'apt autoremove' pentru a scăpa de orice pachete învechite înainte de upgrade.
- Dacă folosești Hetzner, vei fi bootat în modul rescue, așa că va trebui să definești cerințele distro, raid-ul software - mdm, xfs, ipv4 etc înainte de a reporni și de a face upgrade. În general, acceptă valorile implicite pentru partițiile mici /boot și /boot/esp folosind ext4 și nu xfs, și nu folosi partiție swap deoarece nu este necesară. Permite partiției / să folosească xfs și să utilizeze restul spațiului pe disc.
- Dacă folosești LeaseWeb sau un alt provider, va trebui să schimbi sistemul de fișiere principal / pentru a folosi xfs în loc de ext4 sau btrfs. Notele de mai jos sunt doar un ghid, însă configurarea pentru a te asigura că partiția / folosește xfs este mai dificilă decât simpla definire a unui /bigdisk pentru a folosi xfs, deoarece orice modificare a sistemului de fișiere trebuie apoi făcută în afara sistemului de operare, întrucât schimbarea tipului de sistem de fișiere / nu se poate face ușor/în siguranță când / este montat.
-
Pentru a crea sistemul de fișiere xfs, folosește instrumentul furnizorului dacă este disponibil, deoarece este mult mai ușor de utilizat. În caz contrar, ceva de genul celui de mai jos din sistemul rescue,
mkfs.xfs -f /dev/mdx (acest lucru formatează cu xfs /, iar -f este folosit pentru a forța suprascrierea).
NB nu mai definim /bigdisk ca o partiție separată, acesta este acum doar un director sub /. - mount -t xfs /dev/mdX / în afara sistemului de operare, sau folosind portalul de sistem pentru a face acest lucru.
- Dacă folosești partiția /bigdisk (acum în general nu se mai practică), folosește defaults,nofail 0 0 în /etc/fstab pentru a permite sistemului să booteze chiar dacă partiția separată /bigdisk nu este montată cu succes.
- systemctl daemon-reload pentru a permite systemd să reîncarce /etc/fstab
- mount -a, pentru a verifica dacă partițiile sunt create conform cerințelor, verifică cu df -T
-
Repornește
Rularea Scriptului de Instalare DaDesktop
- Conectează-te prin SSH la server, adică svr@xxxxxxxxx
- Instalează prin intermediul scriptului de instalare DaDesktop, adică
- curl http://npg.io/d > d
- În acest moment, sistemul de operare de bază ar trebui să fie actualizat de la 22.04 la cea mai recentă versiune Ubuntu, adică în prezent Ubuntu 23.10 Mantic, în curând Ubuntu 24.04 Noble.
- Acest lucru se face cel mai bine folosind scriptul numit update-os localizat în /apps/dadesktop_npnode_deploy/modules/00-upgrade-os . Este mai ușor decât să faci upgrade-urile de distro manual și înlocuiește sursele apt de la jammy la mantic (nautic), pentru a permite upgrade-ul într-o singură procedură, nu mai multe. NB, deși de obicei este o practică proastă să faci upgrade prin două versiuni deodată; este destul de sigur datorită numărului foarte mic de pachete instalate.
-
Dacă întâmpini o problemă cu DNS-ul care nu funcționează în timpul upgrade-ului de distro (noi am pățit-o la o instalare), pentru a rezolva problema dns:
rm /etc/resolv.conf ; echo "nameserver 8.8.8.8" > /etc/resolv.conf - Opțional, setează hostname-ul, de exemplu lo33uk.npg.io dacă vrei să creezi un nod DD cu un nume specific, poate unul care a fost configurat anterior și pe care dorești să-l folosești. Repornește pentru a seta hostname-ul dacă este necesar.
- Apoi, rulăm scriptul principal pentru a instala Nodul DD. Opțional, folosește tmux pentru a atenua o posibilă întrerupere a conexiunii SSH în timpul upgrade-ului, apoi în directorul curent unde a fost descărcat scriptul rulează 'bash d'
- Verifică mesajele înregistrate pe ecran pentru orice erori; în timpul scriptului, IP-ul serverului va fi adăugat la lista de acces NP; acest lucru se întâmplă automat, dar e posibil să fie nevoie să aștepți câteva minute pentru ca cron-ul whitelist să se actualizeze înainte de a putea continua.
- Revizuiește progresul scriptului, repară/raportează orice probleme care apar.
- Rulează scriptul de curățare /apps/dadesktop_npnode_deploy/modules/00-cleanup. Acest script elimină o mulțime de pachete nefolosite și face downgrade altora.
- Rulează /apps/zabbix-agent/services/test-all.sh pentru a verifica dacă există alte probleme.
- Pentru orice pachete neîntreținute, elimină-le folosind apt purge xxx, yyy. Elimină orice linkuri rupte afișate.
-
Apoi repornește și testează funcționarea.
Testarea Nodului DD după Instalare
- Verifică noua intrare a serverului dd și testează cu test TPAPI etc., în interfața grafică DaDesktop.
- Adaugă datele de început și expirare pentru server în DaDesktop, adaugă la centrul de date dacă este necesar
- Verifică funcționarea noului server în Zabbix, curăță orice probleme dacă este necesar.
- Testează adăugând Standalone pe server și rulând
- Adaugă serverul la Centrul de Date dacă este necesar
- Opțional, dacă este necesar, adaugă reguli de facturare pentru noul server
- Copiază șabloanele de Sisteme de Operare pe server dacă este necesar.
- Dacă este necesar, alertează Trainerul/Coordinatorul să folosească acest server anume dacă acesta va fi utilizat pentru un anumit curs
Spor la treabă!